In this tutorial we will set-up and run a Swiss system tournament with EKC Tournament Manager.
When running a Swiss system tournament, there are a few conceptual decisions to make. If you want to read up on the details about number of rounds, pairing options and seeding etc. we recommend the following links:
- Wikipedia: https://en.wikipedia.org/wiki/Swiss-system_tournament
- Swiss system: https://senseis.xmp.net/?SwissTournament
- Swiss pairings: https://senseis.xmp.net/?SwissPairing
Create a Tournament
Login to the WordPress administration backend and navigate to the EKC Tournaments menu. Create a new tournament with the New tournament button.
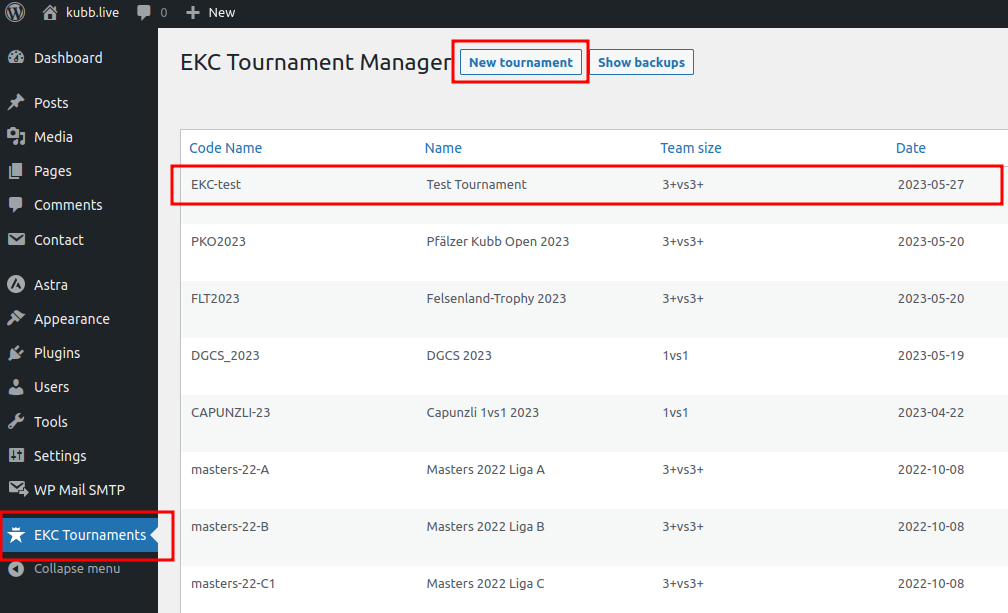
When creating a new tournament, there are quite a few options to choose from. We will discuss a typical set-up for a Swiss system tournament, similar to the EKC tournament itself.
Code name: Technical identifier for a tournament. It is used to reference a tournament in WordPress shortcodes and should be short and descriptive and contain no spaces. Examples are EKC18-1vs1 or PKO-2020 or similar. In this tutorial we will use EKC-test.
Name: Name of the tournament, it will be displayed in the backend and the frontend and is used in e-mails sent to teams and players.
Team size: Common options are 1vs1 for a single player tournament and 3+vs3+ for a team tournament (where teams of 3 people or more are allowed).
Date: Date of the tournament. Used for sorting in the backend.
Maximum number of teams: Limits the number of teams. Additional teams are put on a waiting list.
Tournament system: Choose swiss+elimination for a Swiss system tournament. Other options are not supported at the moment.
Elimination bracket: Choose the number of teams that will make it to the elimination stage. As a rule of thumb, not more than 1/4 of the total number of teams should qualify for the elimination stage.
Maximum points per round for elimination bracket: Common choices are 2 for a best-of-3 match or 3 for a best-of-5 match.
Number of rounds of Swiss system: Depending on the total number of teams and the number of sets played per round. We recommend playing 7 or 8 rounds on 2 sets each and 8 or 16 teams qualifying for the elimination stage.
Maximum points per round for Swiss system: Usually the number of sets played in each round, rewarding 1 point for each set. If you play more than 1 set in each round, make sure to give enough time so that all sets can be finished in time. In each round the same total amount of points should be awarded to the teams. With a tight time schedule, consider applying a tie-break rule to finish started sets quickly after a given amount of time.
Number of slide match rounds for Swiss system: When using an initial seeding, the first few rounds (e.g. the first 4 rounds) should use slide pairing. For all remaining rounds top down pairing will be used. When using a random initial seeding, leave this option empty. See https://senseis.xmp.net/?GroupPairing for details about different pairing options.
If you have an initial ranking based on team or player strength, use it as initial seeding for the tournament. It supports the system in achieving a stable ranking more quickly. This is especially true for large tournaments or for tournaments with a tight time schedule where you cannot play that many Swiss rounds before the elimination stage.
Time limit for a Swiss system round: Depends on the skill level of the teams and the number of sets played in each round. Make sure to allow enough time in each round, so that all sets can be finished.
Time limit until tie-break: Time limit until tie-break starts. With “tie-break” we mean a special rule that is applied to finish an already started set quickly, e.g. by removing kubbs from the game, with the goal to award the full amount of points in each round.
Start pitch number: Useful if you run two tournaments in parallel, e.g. a main tournament and a secondary tournament for less ambitious teams. The second tournament can then start on a higher pitch number.
Register Teams
After creating a tournament, we want to register teams (or players in case of a 1vs1 tournament).
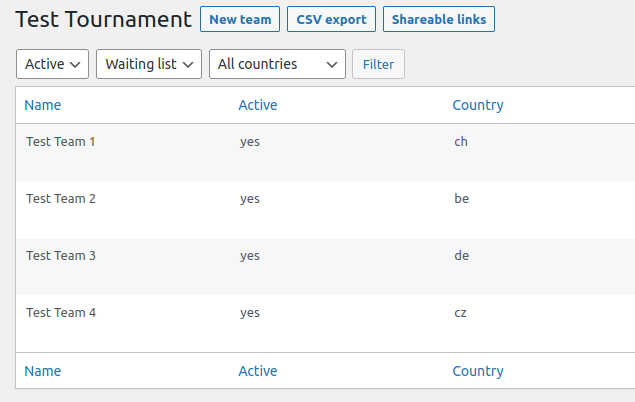
Click on the Teams link on a tournament to see all registered teams.

You can manually add new teams with the New team button and edit existing teams with the Edit link.
When adding a new team, fill in all form fields as appropriate. Fields marked with a * are mandatory. All options can be changed later if needed.
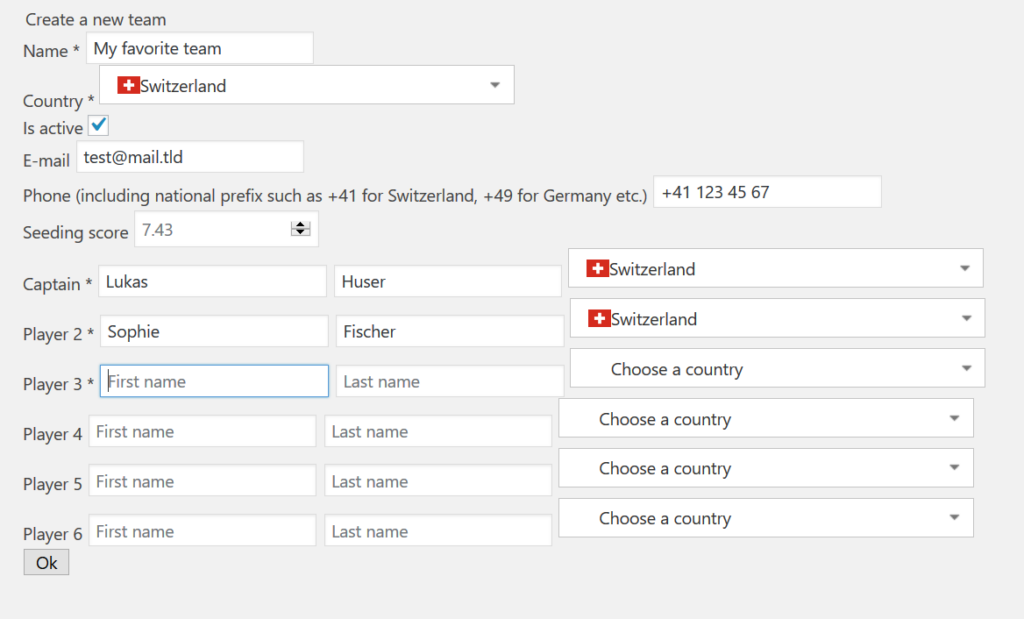
Depending on the options chosen for your tournament, the number of players per team and other options may differ.
Is active: If a team unregisters from the tournament, you cannot delete it, simply set it to inactive (untick the Is active checkbox and store the form).
Export all Teams to CSV
Use the button CSV export to export all teams to a CSV file, which can be imported to Excel or an e-mail tool such as MailChimp or similar. In this tutorial we will export the teams to a CSV file and import it to Excel.
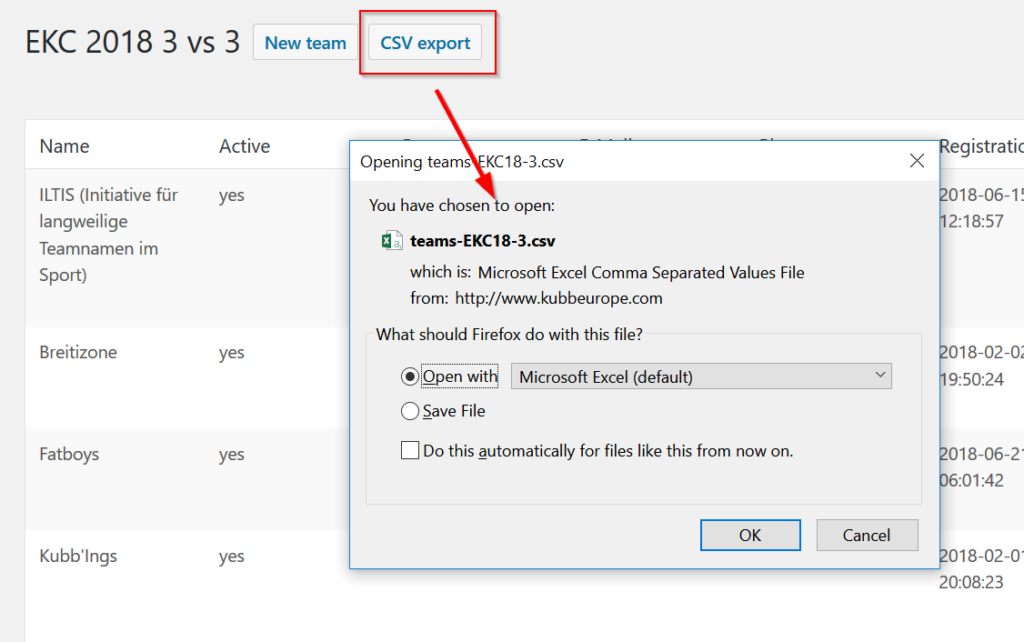
Note: the CSV file is UTF-8 encoded and is able to display all the special characters such as umlauts correctly. If you have trouble with special characters when opening the CSV file directly in Excel, try the following:
- Download the file and save to disk
- Open a new spreadsheet in Excel
- Import the file through Data -> From Text
- Choose Delimited and UTF-8 encoding
- Choose Semicolon as delimiter
- Optional: Mark the phone column as Text (instead of General)
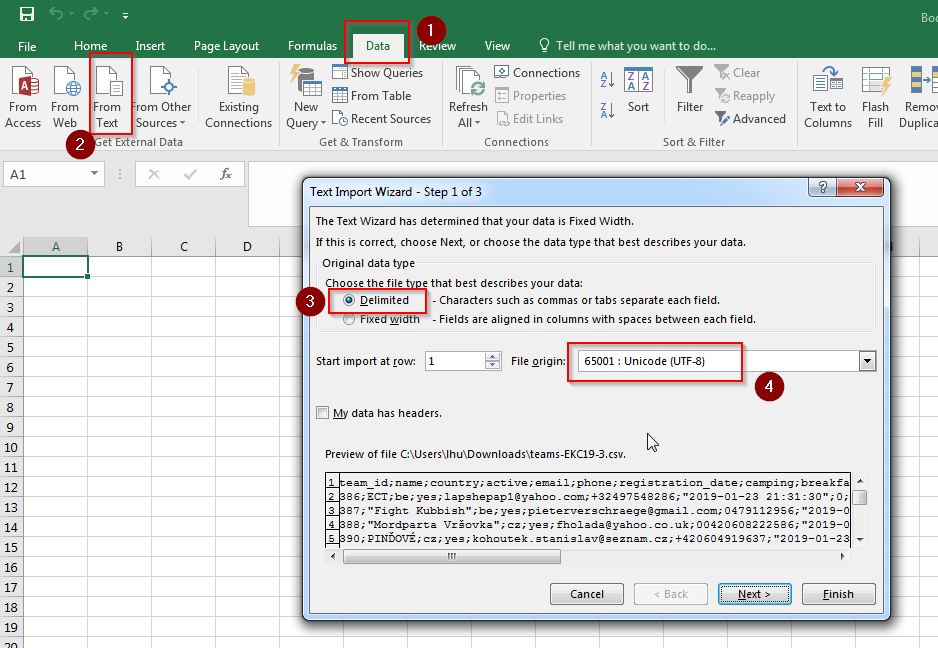
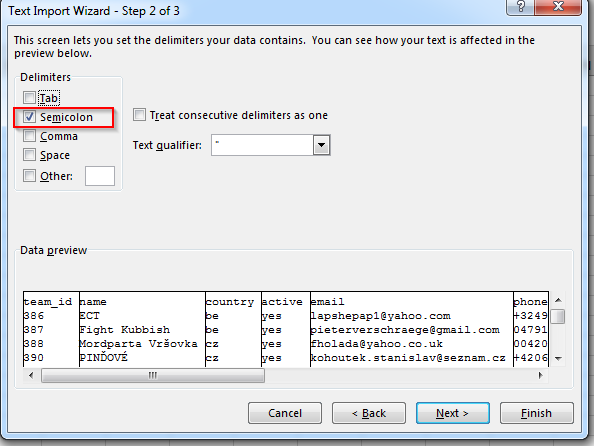
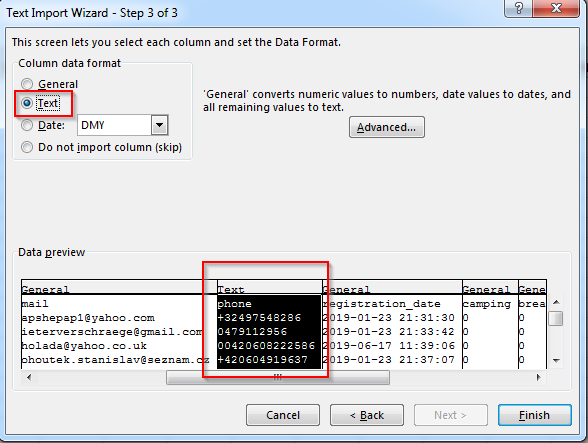
List registered Teams
For a small private tournament, managing teams in the backend is sufficient. For a public tournament, we want to list all registered teams on the website and provide a registration form, so people can register for the tournament through our website.
How you design your frontend pages is completely up to you. The EKC Tournament Manager plugin provides WordPress shortcodes which can be embedded in your pages. You can find the complete shortcode reference in the technical documentation on Github.
In this tutorial we will build a frontend page with the list of all registered teams and a registration form.
Create a new page in the WordPress admin backend, as a title you can choose the name of the tournament. Insert a shortcode block or text section and add the following shortcode:
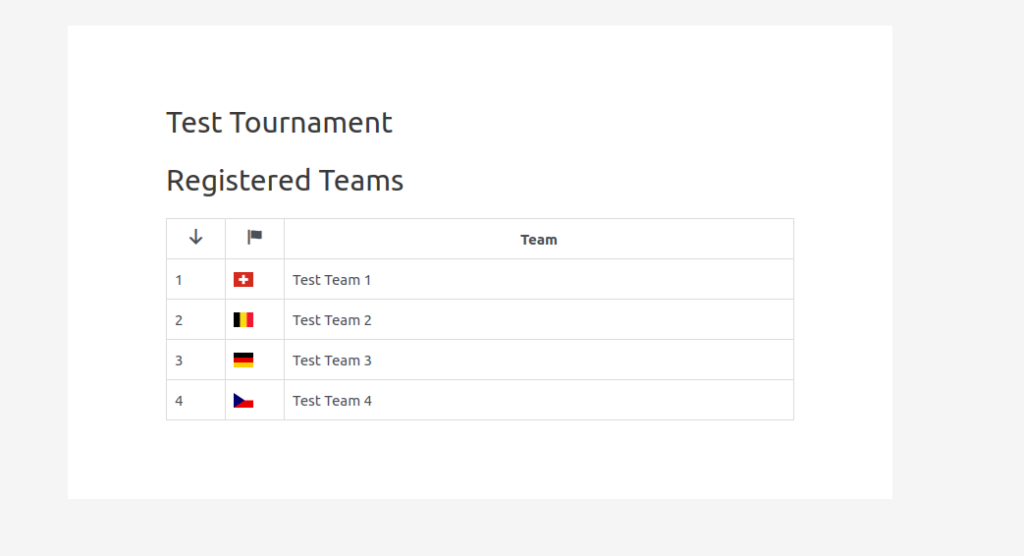
[ekc-teams tournament="EKC-test" country="true" club="false"]The tournament parameter corresponds to the code name attribute when we created the tournament. The country and club parameters can be set to true or false. If true, an additional column is displayed in the table with the country flag of the team, or the name of the club of the team, respectively.
If you set a maximum number of teams on your tournament, this list will be limited to the chosen number of teams.
If you want to display the teams on the waiting list as well, add a second shortcode as follows:
[ekc-teams tournament="EKC-test" waitlist="true" country="true" club="false"] 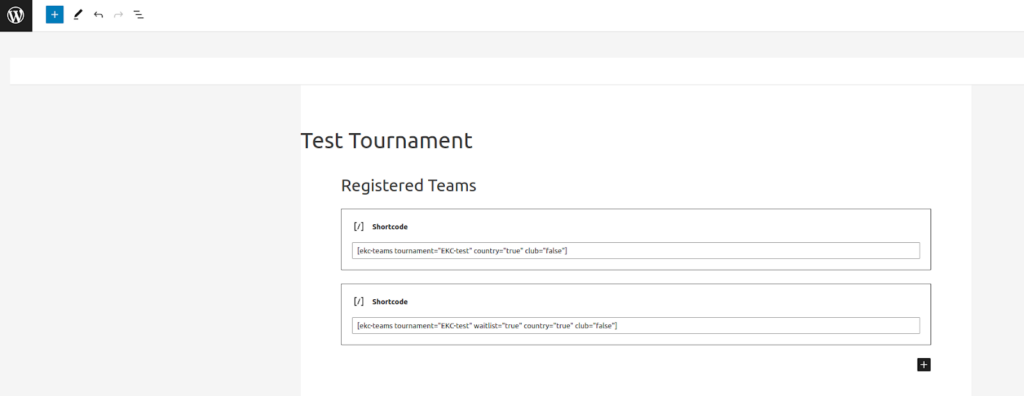
Click on Preview to see the result:
Registration Form
To add a registration form, you need an additional form builder WordPress plugin, as WordPress does not support such a feature by default. EKC Tournament Manager has support for Elementor and Contact Form 7. Because Elementor supports forms only in the paid pro version, we will use the free and popular Contact Form 7 plugin in this tutorial.
Before we continue, make sure to install the Contact Form 7 plugin through the WordPress plugin store.
Create a new contact form with input fields for team name, e-mail address and phone number as follows:
<label> Team name
	[text* ekc-teamname] </label>

<label> E-mail
	[email* ekc-email] </label>
<label> Phone number
	[phone* ekc-phone] </label>

[hidden ekc-tournament default:shortcode_attr]

[hidden ekc-active default:shortcode_attr]

[hidden ekc-waitlist default:shortcode_attr]

[submit "Register team"]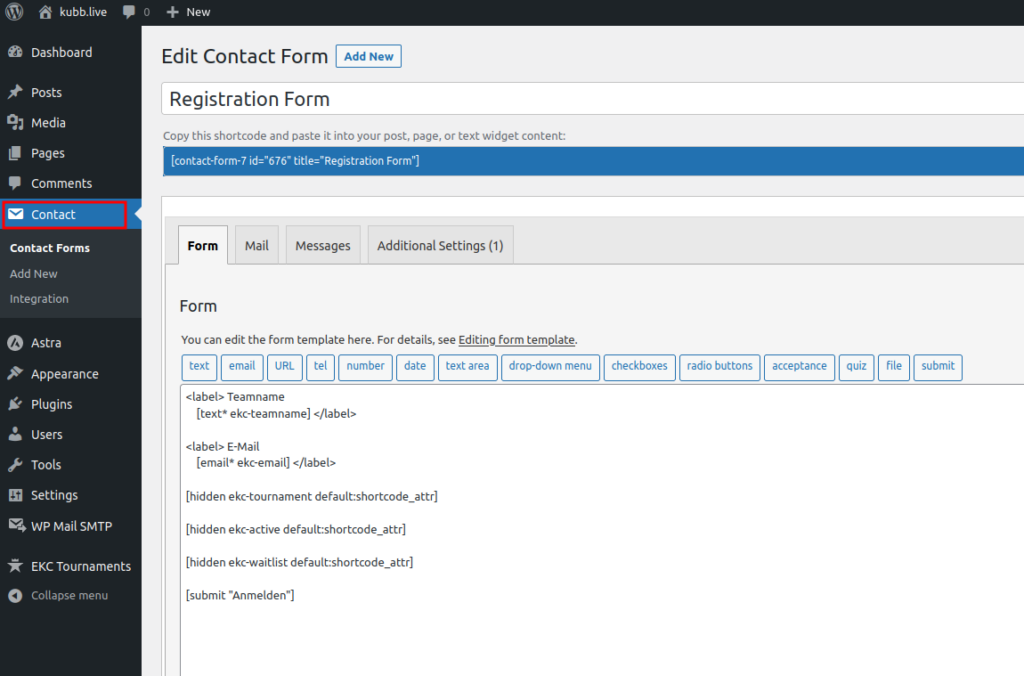
Note that the values for the tournament itself (the tournament code name) as well as values for the active and waitlist attributes for registered teams are not defined in the form definition. They will be provided when embedding the form through a shortcode in the frontend page.
To include the contact form in the frontend page, use the following shortcode:
[contact-form-7 id="123" title="Registration" ekc-tournament="EKC-test" ekc-active="true" ekc-waitlist="false"]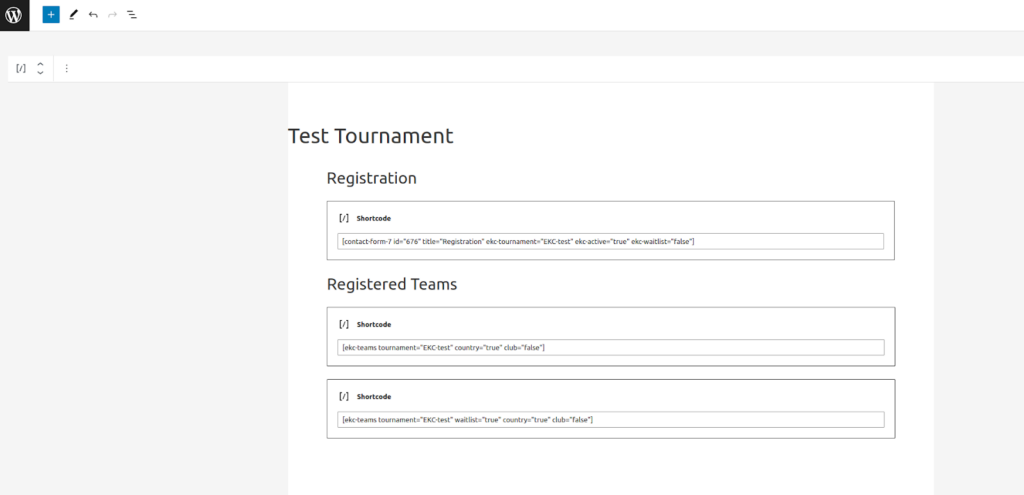
Again, let’s check the preview:
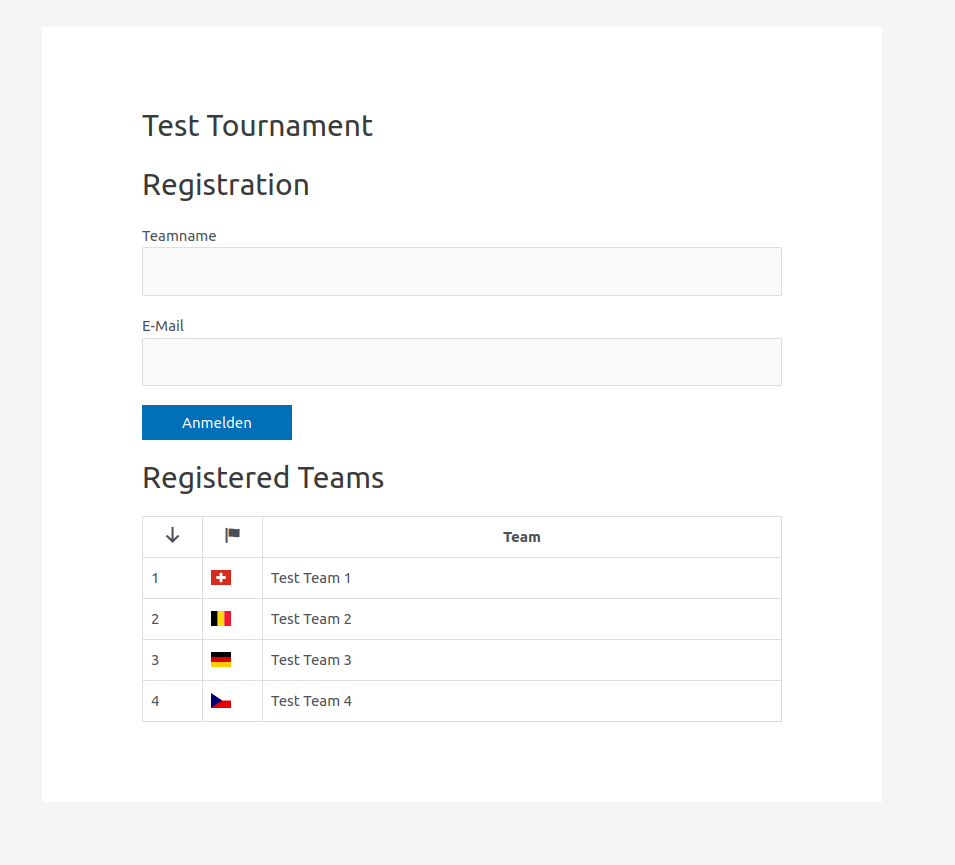
In this example active is true and waitlist is false. I.e. new teams are visible in the list of registered teams immediately (active) and are not on the waiting list. If you prefer activating teams manually after checking for duplicate registrations or similar, you can set active to false and switch it to true manually in the backend after verification. If the registration limit is reached, you can adapt the waitlist parameter to true, so every new registration is put on the waiting list automatically.
You can find the full documentation for Contact Form 7 integration in the technical documentation on Github.
Personalized Links
The EKC Tournament Manager can generate a personalized link and send it by e-mail to each team. Through this link, each team can access their matches including pitch numbers and report the result for each match themselves.
Personalized Links Page
First, we need to set up another frontend page, where we will display the relevant data for each team.
Note: we will create a single page only, which will be dynamically adapted for a given team. In fact, we can use the same page even for multiple tournaments, because the personalized link IDs are globally unique.
Choose a short and descriptive slug for this page, as it will be part of the URL that will be sent out to all teams. A good example is simply team as the slug. The final URL which will be sent to teams then looks like:
https://kubb.live/kubb-live/team?linkid=1387-QTfWTsz1LPY3CZwl3Kgv
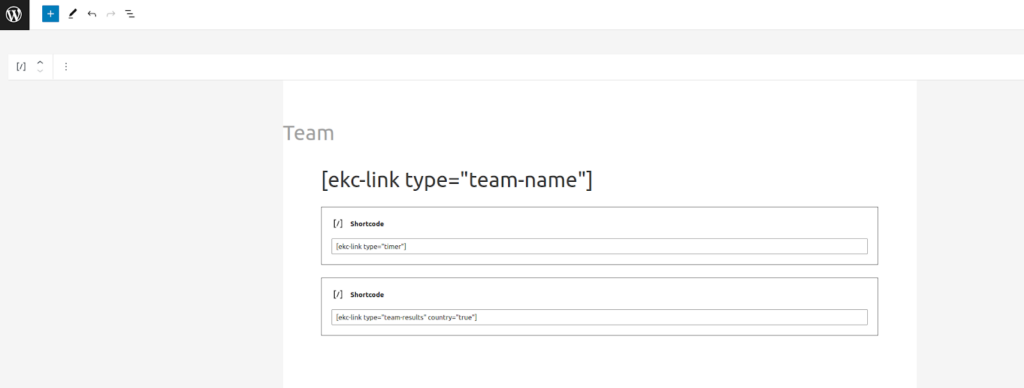
As the title of the page we use the team name itself. We can achieve this with the following shortcode:
[ekc-link type="team-name"]If you defined a time limit on your tournament, you should add a timer to this page. Teams can then see how much time is left in the current round. Again, we use a shortcode:
[ekc-link type="timer"]Finally, we want to add the relevant data for a given team to this page. Again this is done with a sortcode:
[ekc-link type="team-results" country="true"]And that’s it. Note that we do not provide a tournament code name to the ekc-link shortcode, it will read the linkid URL parameter from the browser address bar and display the relevant information for the team referenced by the given link ID.
Send Personalized Links
Now we need to generate the personalized links for our tournament. In the list of all teams, click the Shareable links button.
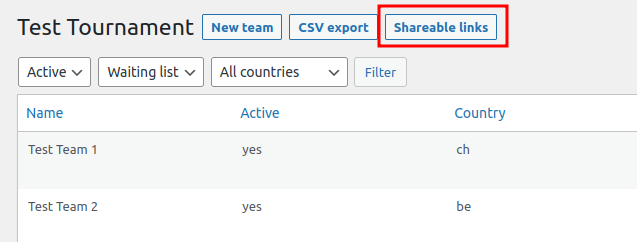
On this page, you must define a URL prefix, the sender e-mail-address and the e-mail text which will be sent to all the teams.
The URL Prefix field should contain the full URL of the personalized links page (which we just created in the previous step), including a trailing “?”. The generated URLs will simply append an URL parameter linkid= to the URL Prefix. An example for an URL prefix looks as follows:
https://kubb.live/kubb-live/team?
A full URL (which will be generated later) then looks like:
https://kubb.live/kubb-live/team?linkid=1387-QTfWTsz1LPY3CZwl3Kgv
The sender e-mail-address may simply be an e-mail address, or include a sender name. The sender name could be the tournament name or the name of your club for example.
Your server and/or your WordPress installation must be correctly set up to be able to send e-mails with the given e-mail-address. If your WordPress installation was installed through your hosting provider, this is usually the case. However, if your WordPress installation does not support sending e-mails out of the box, you may need to install an additional plugin, such as WP Mail SMTP.
The e-mail text can be as long (or short) as you wish. Just make sure to include the personalized URL through the ${url} parameter. For a personalized salutation, use the ${team} parameter, which will be replaced with the actual team name when sending the e-mail.
A minimal example text might look as follows:
Hello ${team}

Welcome to the EKC Test kubb tournament!

You can access all your matches through the following personalized link:
${url}

Through this link, you can report your results yourself. The winning team shall report the result in each round.

Please forward this e-mail to your teammates.

Greetings,
the EKC Test tournament team
If you have provided and saved all the necessary data, we can finally generate the personalized links through the Generate all shareable links button. Then send out the e-mails a few days before the tournament starts with the Send all shareable links button.
Before you send out all e-mails, it is good practice to send a single test e-mail to yourself. You can verify the e-mail content and check that the link works as expected. Use the Send link menu for a single team in the list of all teams.
Important: do not generate new links after sending out the links to all teams. If you have a few late registrations, joining after all mails have been sent out, use the Generate link and Send link menus for single teams.
Live Results
Similar to the pages for registration and the personalized link page, you might want to publish the live results of your tournament on your website. People who cannot attend can follow the matches during the tournament and all results are available online after the tournament is finished.
In this tutorial we will build two pages, one page with the total ranking and a page with all results from the Swiss system rounds. How exactly you arrange these pages is up to you, usually the result pages are added as sub-pages to the tournament main page and are available through menus.
Create a new page and add the following shortcode to show the current ranking:
[ekc-swiss-system tournament="EKC-test" ranking="true" country="true"]Optionally, also add a shortcode for the elimination bracket:
[ekc-elimination-bracket tournament="EKC-test" country="true"]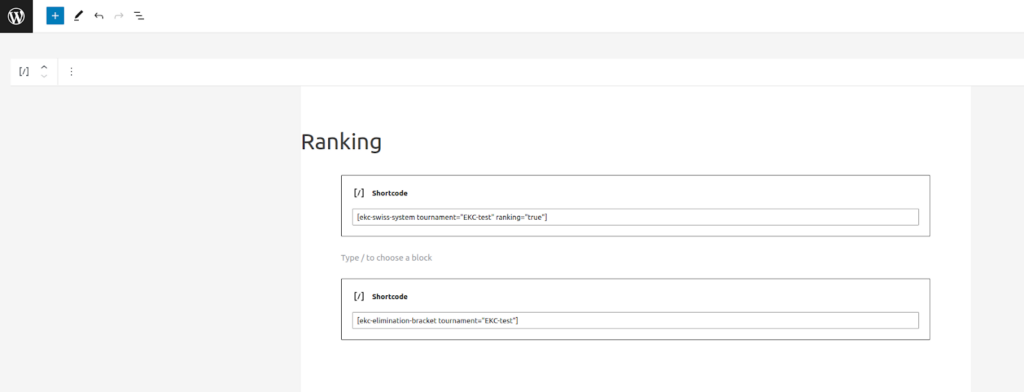
Create another page and add the following shortcode to show all Swiss System matches for your tournament:
[ekc-swiss-system tournament="EKC-test" rounds="all" country="true"]
There exist a few additional parameters for these shortcodes. For the full reference, check the technical documentation on Github.
Copy existing Pages
If your tournament takes place every year, you will need to create new pages for each new edition of the tournament. While you can re-use the pages with the list of registered teams and the registration form by simply changing the tournament code name, you might want to keep the results pages (ranking, all rounds etc.) from the previous tournaments and create new pages for the new tournament. To quickly set-up new pages based on existing pages, you can use the Duplicate menu on pages and change the tournament code name in the new page.

This will create a copy of the existing page, in status draft, with a “Copy” suffix added to the page name.

Seeding
After registration of teams is closed, there are a few things to do before you can start the tournament.
Defining seeding scores is optional. If you can come up with a reasonable pre-defined ranking, you should use it for the initial seeding. Initial seeding helps the system to reach a stable ranking more quickly.

Choose the Swiss System link on your tournament, then click on ranking. Insert a seeding score for each team and save the data. The initial ranking is updated to reflect the seeding scores. You can use decimal numbers, which allows you to squeeze in additional teams at a later point in time.
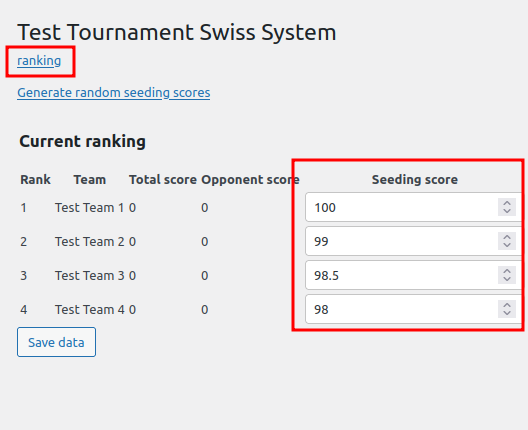
Alternatively, you can use random seeding. In this case, choose the Generate random seeding scores button, and you’re done.
Running the Tournament
The day of the tournament has arrived and we’re finally ready to run our tournament!
Before the Tournament Starts
Before you start the tournament, make sure everybody is present on the tournament ground.
If necessary, it is possible to add additional teams right before the tournament starts. Just add a new team, generate a link and send it out. It is also possible to cancel a team last minute, if it cannot arrive on time. To cancel a team, simply inactivate the team through the inactivate link on the respective team.
As soon as the tournament has started and the first round of pairings was generated, you cannot go back and add additional teams or cancel teams that did not show up. The only possibility is to completely re-start the tournament, which we really want to avoid.
If you started the tournament and it turns out later that one of the teams is not present, you cannot remove it anymore from the tournament. Treat this team as a BYE, opponents of this team will usually get the full points for the round without actually playing a match.
Start the Tournament
To start the tournament, click the Swiss System link on the tournament:

Then hit the Start tournament button!

All active teams are now added to the tournament and pairings for the first round are calculated. If you have an odd number of teams, a BYE will be added automatically. Teams matched up against BYE usually get the full number of points for a single round awarded. You need to enter this result manually.
Running a Swiss System Round
As soon as the pairings are generated, the teams can see their opponent and the pitch number through their personalized link. You should give the teams a few minutes to find the pitch before you start the timer for the current round.
If you use a time limit for the Swiss system rounds, you should use a separate device to track the time (e.g. start a timer on your mobile phone). Click the start timer link for the current round simultaneously with the device. The reason is quite simple: the website will not refresh itself or output a warning when the time limit is reached. It helps people to know how much time is left in the current round, but it is not a full replacement for a timer device with an alarm.
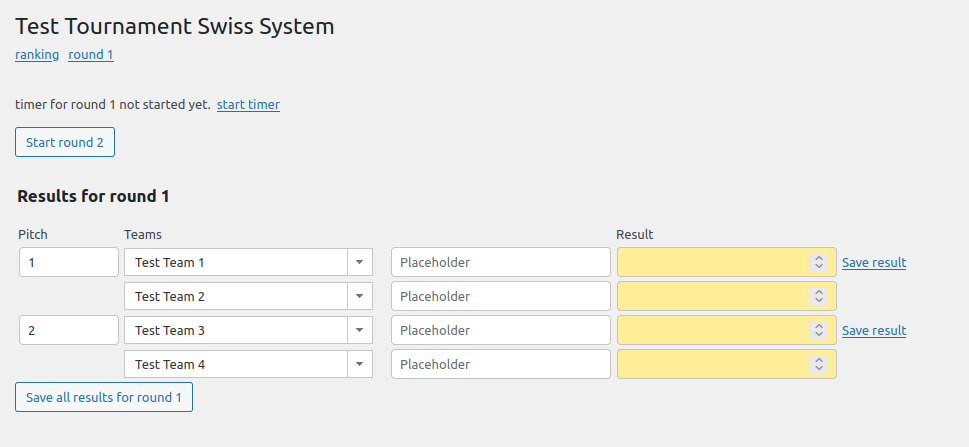
After the matches have finished, people will start entering their results. To check for already entered results, you can refresh the page. Click on the round 1 link for that purpose, it will reload the page showing all pairings and up-to-date data for the results for round 1. Do not use F5 or the refresh button of your browser! You might trigger a different action (such as resetting the timer) which was not intended.
Missing (empty) results are colored yellow. Reported results are colored white. Even for a fairly large tournament it is feasible to scroll down the long list of results and spot the yellow fields. If necessary, collect these results directly from the teams or announce the missing results.
Make sure to collect all results before starting a new round. If you try to start a new round with some results still missing, the system will let you know:
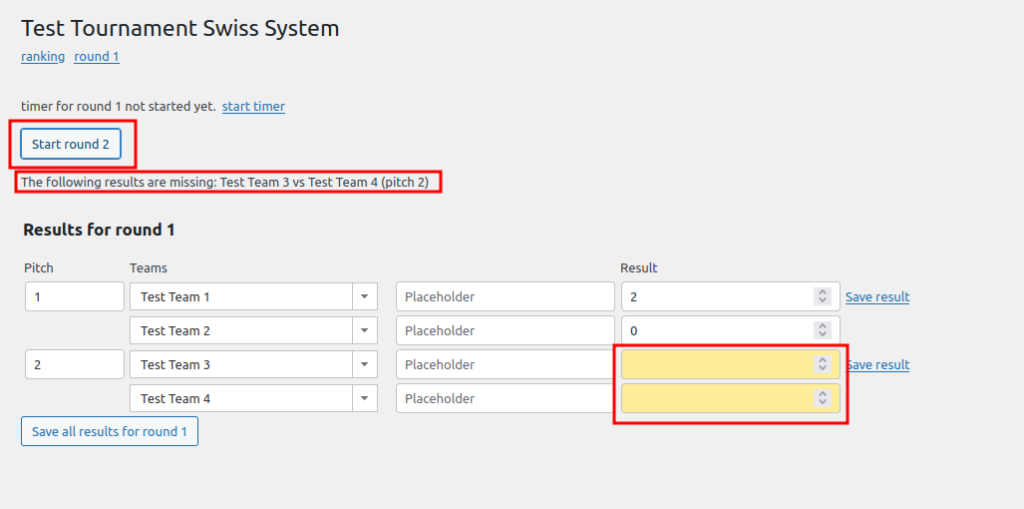
If you want to enter some of the results yourself (because some teams might not have a mobile device to enter their results themselves), this is possible. Just enter the result in the appropriate fields and click the Save result link.
Important: do not use the Save all results for round 1 button if you sent out personalized links and people are entering the results themselves. This button will store all the data from your browser to the database, potentially overwriting results just entered by the teams through the personalized link. If you enter or change a result in the backend, always use the Save result link for a single result.
If all results have been entered (no yellow fields are left), you can start the next round, in this example with the Start round 2 button.
Correcting wrong Results
It might happen that people enter wrong results. As long as the next round has not been started, this is no problem, existing results can be easily updated.
However, if the next round has started already, people cannot change the results anymore through the personalized links. It is of course possible to change the result in the backend.
If people did not start playing the matches already, it is possible to delete the current round, correct the wrong results and re-calculate the next round.
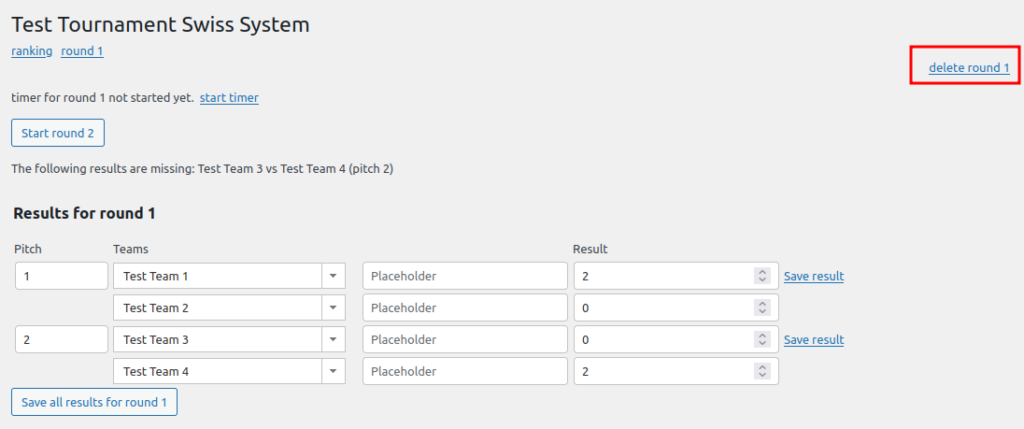
Deleting a round will completely remove it, including any results which have already been reported. Use this menu with care and only as long as no results have been entered, or people did not start playing their matches already.
In the worst case, you cannot stop the current round and still need to fix a result in one of the previous rounds. The only option we have is to correct the result in the backend. It will have an effect on the current ranking. Calculation of the pairings cannot be undone, the pairings have been calculated based on an inaccurate ranking, but there’s not much we can do about it.
Elimination Bracket
After all the Swiss system rounds have finished, the best teams will usually play an elimination bracket to find the winner of the tournament. Depending on the size of the tournament, these are usually the best 16 or 8 teams. As a rule of thumb: after playing 7 or 8 rounds of Swiss system, there should not be more than 25% of the total number of teams making the cut to the elimination bracket.
Make sure that you don’t have a tie on ranks 1 to 8 (or 16). If two teams have exactly the same score (main score and opponent score), you should use some kind of tie-breaker or a shootout to find the final ranking, which will define the exact position in the elimination bracket.
Click the Elimination bracket link on your tournament

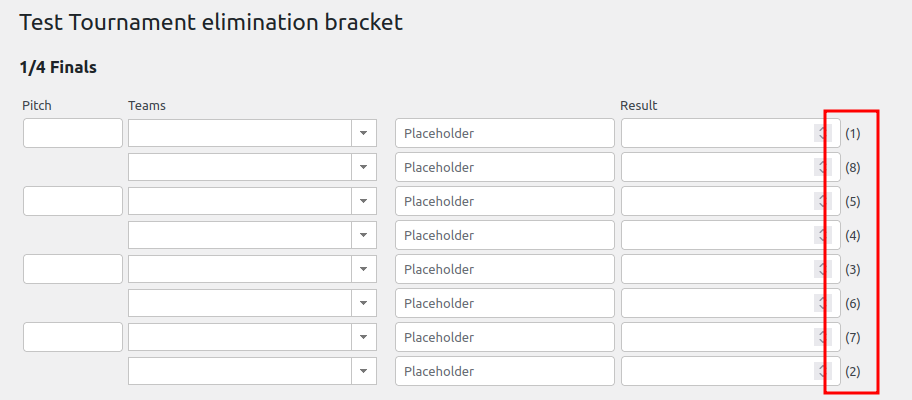
Now you can assign pitch numbers and enter the teams through the drop-down menu. The numbers in parentheses (1) etc. correspond to the final Swiss system ranking. This is to make sure that each team is placed at the correct position in the elimination bracket.
